Hero Gear is a vital aspect of Last Fortress: Underground. At first glance, it might be pretty straightforward, but there are still some nuances to gear, which I will go through in this guide.
This guide will lead you through hero gear types, obtaining hero gear, and using hero gear in the game. I have a separate guide to APC (truck) Gear.
To learn more about heroes in Last Fortress, check out my Hero Guide. For more information about lineups, take a look at my Lineup Guide.
Let’s get started, then.

Gear Classification
Rarity (Quality)
There are five quality levels when it comes to gear:
- Uncommon (green)
- Rare (blue)
- Elite (purple)
- Epic (orange)
- Master (red) – S4+
Rarity affects the following:
- How many stats a piece of gear has
- Uncommon – 2
- Rare – 3
- Elite – 5
- Epic – 6
- Master – 7
- The starting power level of the first two stats
- The higher the quality, the better the power.
- If there’s a set bonus
- Sets are available starting from rare gear.
- But, if crafted, uncommon gear can have sets.
- Chances of getting the piece in chests or when crafting
- The higher the quality, the lower the chance.
- Master gear can only be obtained by Refining it with a Gear Modifier.
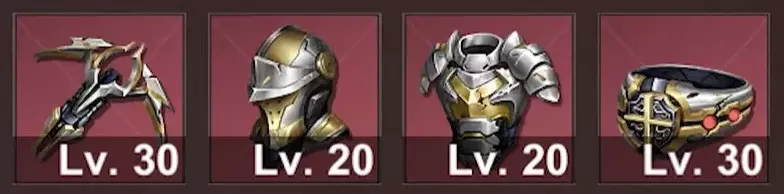
- The maximum level of a gear piece
- Uncommon – cannot upgrade
- Rare – 5
- Elite – 15
- Epic – 20
- Master – 30
- The number of Tin Blocks you get for one piece when disassembling
- Uncommon – 2-3
- Rare – 4-6
- Elite – 20-30
- Epic – 30 + a Supercharger
- Master – no idea
By the end of season 0 (S0), you should be able to get at least all the elite gear for your combat heroes. From that point, uncommon and rare gear will become obsolete and will be used only as a Tin Block source. Rare gear can be put on your Solari heroes, but only until you have enough Elite gear for them. This will be discussed in more detail further.
Sets
Generally speaking, there are sets for damage dealers, tanks, and support heroes, but they are not cut in stone. More about this further under the Usage.
When you equip items from the same set, you get two bonuses – the first one when you equip any two set pieces and the second one when you equip all four.
As of the current game version (25.0204.001), there are 13 standard and 40 unique gear sets. Missing only the data on the exclusive set for the bar girl (Christina). If you have this set, please send me its details.
Getting Gear
I’d say gear was the second most crucial aspect after getting the heroes. That is mostly epic gear. So, use every chance there is to get epic gear in the game or upgrade it.

Events and Activities
You can obtain gear through the following in-game events and activities:
- First capture of neutral cities (S1-S5): Every alliance member gets one chest after the city is captured for the first time, and every participating member will get one chest. Hence, for each city, you can get two gear chests.
- There is a low (1-3%) chance of getting epic gear from these chests, so getting them is vital.
- Expedition: You can get gear chests of various rarities by completing the expedition train station levels. Once you reach the last station and upgrade your train to the maximum, you will be able to get 15 elite expedition kit chests, seven rare expedition gear chests, and seven uncommon expedition kit chests just by dashing to the maximum length and breaking, which will take you like 20 seconds to do. You could also go through the last stations to get a few more chests, but I think the time you will spend on it is not worth it.
- Season quest: A season quest will last around 37 days and allows you to get various rewards for completing missions, including chests with the current season’s gear. By upgrading the quest’s second line for $25, you will have more gear-related rewards for each level, including more gear chests and superchargers.
- Enemy elimination during the personal armaments race: On Saturdays and Sundays, there are two periods when you can get a gear chest for the last milestone (50,000 points). In total, you can get four chests over the weekend.
- Besides the chests, you will also get bronze vouchers that will help you save a bit of $. So, I highly recommend getting these rewards regularly.
- Alliance shop: Once your alliance reaches level 7, you can buy a Rare Expedition Kit for 20,000 alliance points. When your alliance reaches level 16, you can buy an Elite Expedition Kit for 25,000 points. And after your alliance reaches level 20, you can get an Advance Expedition Kit for 250,000 points. The first two are not worth it, as you can get more valuable things for that number of points (hero cards, m-coin hours, speed-ups, zone tickets, gathering boosts, and shields).
- Prestige shop (Dimensions): in Season Special, a [Season of War] Gear Set Chest (Selectable) costs 5,000 Prestige Coins. It’s not worth it, in my opinion. You can get two new heroes for 4,000 or the old ones for 800 each at the Season Shop.
- Strongest Alliance event: An elite gear kit is part of the base reward of the Gold League, and an epic chest is in the base reward of the Diamond and Master Leagues.
- Night Before the War event: Gear chests are among the Intel points’ rewards, but going further than 288k points is usually not worth it until a few dimension seasons after S5, when you have spare iron and z-coins to burn.
However, arguably, the best way of obtaining gear consistently is by crafting it at your Gear Factory, which is covered right below.
Crafting (Gear Factory)
Besides getting gear chests or set pieces as a reward, you can also craft gear in the Gear Factory. Here’s what you can do without a Monthly Gear Pass:
- Gear Factory becomes available once your Control Center is level 15 and exploration is 2-10.
- You will need at least four materials (Forge menu) to craft an item.
- There are nine materials for S0 items and seven for each season onwards.
- You can create materials in the Produce menu.
- You can queue up to 45 materials.
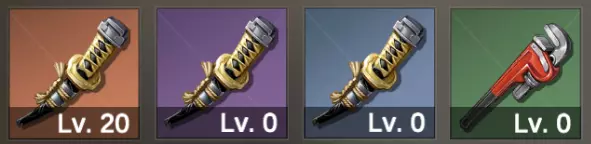
- Each material has a proficiency level (from 0 to 10).
- The more of one material you create, the higher its proficiency.
- The higher the proficiency, the higher the chance to get a higher-quality material.
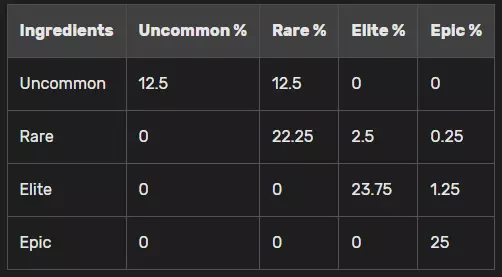
- The higher the quality of materials you use, the higher the chance of getting a higher-quality item.
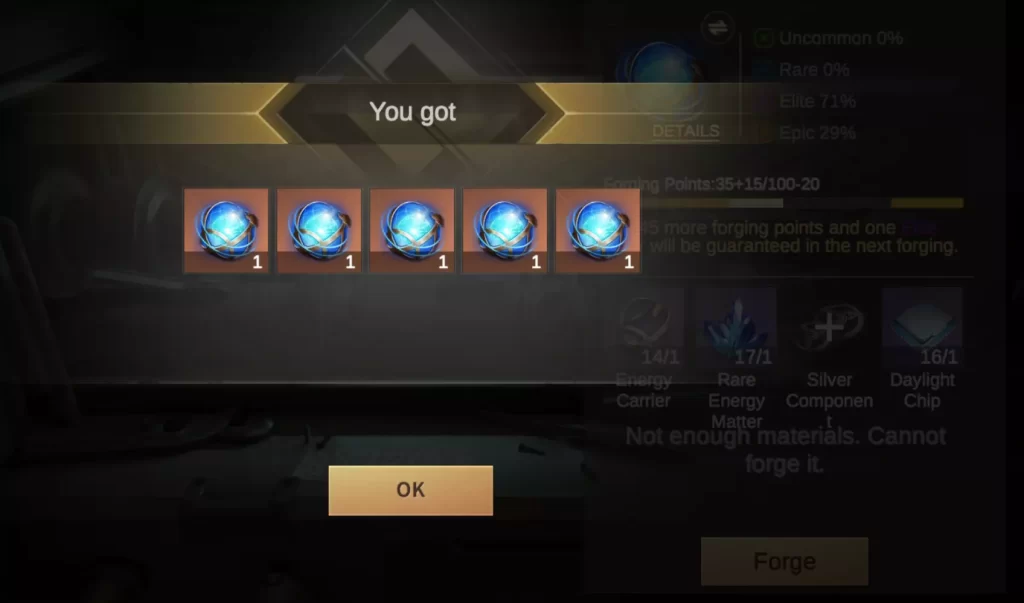
- For example, if you use two rare and two elite materials, the chance to get a rare gear item is 44,5, the chance to get an elite gear item is 52.5%, and the chance to get an epic gear item is 3%. Using four elite materials will give you a 5% chance to get an epic gear item.
- When using materials of rare and higher quality, you will get Forging Points per material used – 1 point for a rare material, 5 for an elite, and 20 for an epic one.
- Forging points are specific for each gear piece and guarantee an elite-quality item upon reaching 100 and (according to the in-game help) an epic item for 500 points.
- Also, forging a gear piece costs z-coins. The price is calculated like this: Forging Points x 10.
- For example, using four elite materials will add 20 Forging Points to the item and cost 200 z-coins to craft.
- Most materials take two hours to produce at proficiency 0 and one hour at proficiency 10. The exceptions are the materials used for accessory (jewelry) gear pieces.
- Starting from Season 4, you can participate in Eden Ruins exploration. You can win bags with epic crafting materials there if you place 30th or higher.
- There are two elite Policy Cards that affect crafting:
- Composite Material – Increases materials production speed.
- Lathe – Increases the chance to gain extra Lucky Points after forging an item.
- The new Solari hero, Cecilia, can further improve the Gear Factory but at a steep overall cost of $170:
- Skill 1: Allows you to produce UW upgrade chips instead of materials. Up to 10 at a time.
- Not really worth it. You’d want to keep producing materials without stopping for chips.
- Skill 2: Queue limit up to +10.
- Not that important.
- Skill 3: Allows you to produce UW breakthrough chips instead of materials. Up to 5 at a time.
- Again, not really worth it.
- Skill 4: Boosts material base production rate up to +50%.
- The only skill you want to have here. Boosts production a lot, allowing for basically +50% of gear produced under the perfect conditions.
- Skill 1: Allows you to produce UW upgrade chips instead of materials. Up to 10 at a time.
Materials production time without Gear Pass:
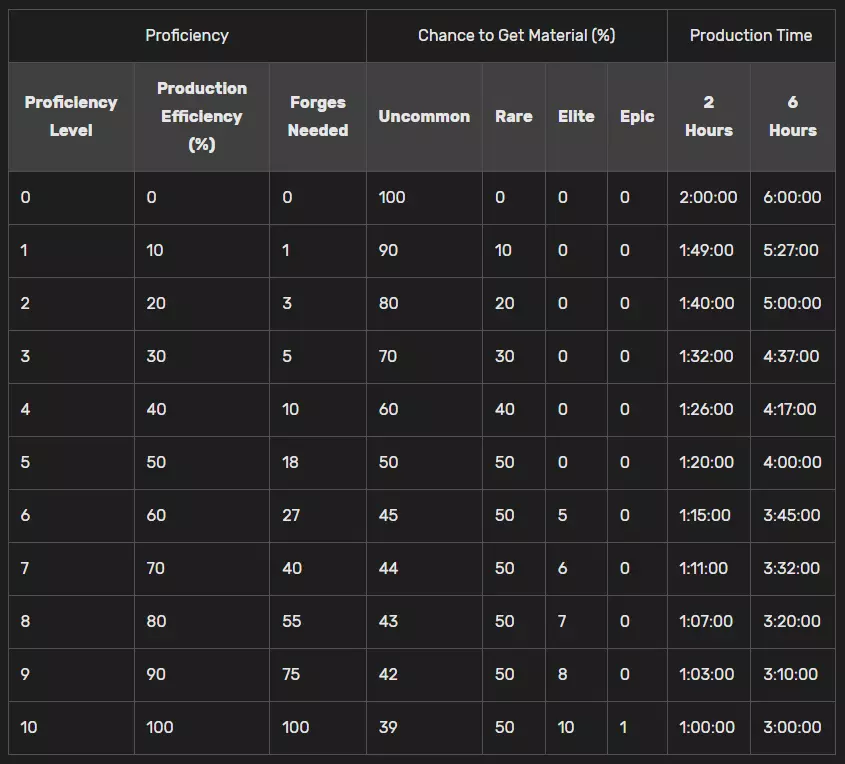
Forging chances for materials
To get a single material to proficiency 10, you will need to produce it 334 times, which will take you about 397 hours (~16 days) for 2-hour materials and about 1173 hours (~ 49 days) for 6-hour ones if done without breaks. Hence, you can have four 2-hour materials maxed out in around two months, given that you do not use any Policy cards and do not have the Gear Pass.
Level 10 proficiency gives you a 1% chance of getting an epic material. Roughly, you will need to produce 100 units of such a material to obtain one epic material, which will take you 100 hours. To produce four of these and have a guaranteed epic gear piece, you would need roughly 400 hours of production, which is about 16 days.
If you cooperate with your alliance members, each of you can focus on one material and then trade them among yourselves. In such a case, you can (in theory) shorten the mentioned 16 days to just four days, which is a considerable improvement. But this will require tremendous cooperation efforts, which has proven to be difficult to achieve in reality.
But remember that 1 in 100 epic material is not a guarantee but a theoretical calculation of probability. You can get more or less lucky in practice.
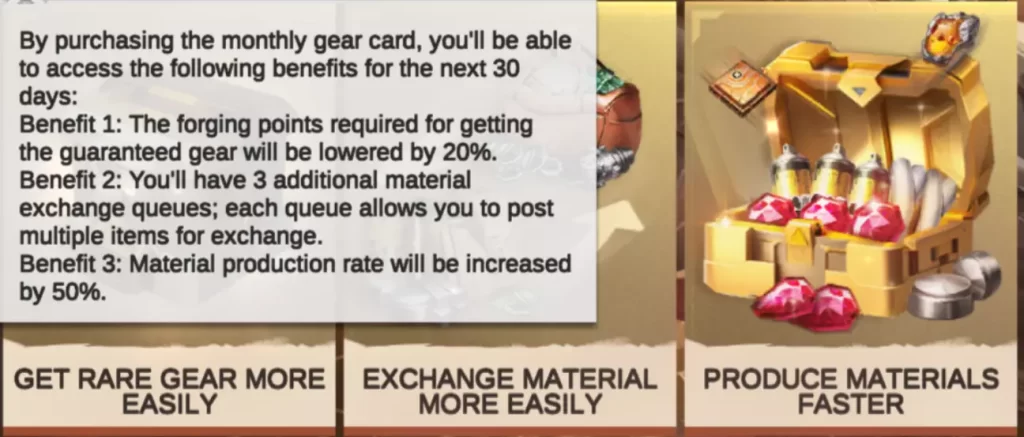
Monthly Gear Pass
You can get a monthly gear pass for $5 if you go to Premium Center → Premium Pass → Monthly Gear Card

Is it worth getting it? I’d say yes. It is the second-best thing worth buying in this game after N.A.T.E. It will help you get many more epic gear pieces in a month, which is essential in this game.
Epic Gear Calculations
Let’s see how much gear you can possibly produce, given the following conditions:
- You have the monthly gear pass active.
- You have one level-10, 2-hour material.
- You keep the production of this material 24/7.
- You have the Composite Material policy card at level 0 but fully activated.
- You constantly trade materials in your alliance to have enough of everything.
With all those conditions met it takes me 16 hours and 15 minutes to produce 65 level-10, 2-hour materials. This is what I can theoretically get in one month:
Note: This is an average estimate, which means it can sometimes be higher or lower.- Monthly Material Production
- Production Time per Batch (65 items): 16 hours and 15 minutes.
- Number of Batches per Month: 30*24hr = 720 hours. 720 hours/16.25 hours per batch≈44.3 batches.
- Total Materials Produced per Month: 44.3×65≈2879.50 materials.
- Distribution of Material Qualities
- Epic: 1% of 2879.50 ≈ 28.79 epic materials.
- Elite: 10% of 2879.50 ≈ 287.9 elite materials.
- Rare: 50% of 2879.50 ≈ 1439.75 rare materials.
- Forging Points Accumulation
- Total Forging Points:
- Elite: 287.9 × 5 ≈ 1439.5 points.
- Rare: 1439.75 × 1 ≈ 1439.75 points.
- Epic: 28.79 × 20 ≈ 575.8 points.
- Grand Total: 1439.5 + 1439.75 + 575.8 ≈ 3455.05 points.
- Total Forging Points:
- Guaranteed Epic Gear from Forging Points
- Total Guaranteed Epic Gear Pieces: 3455.05/500≈6.91 pieces.
- Trading Dynamics (Ideal)
- For every 3 elite materials produced, you trade them for 3 materials of other types needed for forging.
- Similarly, for every 3 rare materials, you trade them for 3 materials of other types.
- Forging
- Epic + 3 Elite Materials (28.75% Chance): 28.79×28.75%≈8.27 pieces.
- But, you can play safe and trade your epic materials for the remaining 3 and get 7 epic gear pieces with a 100% probability.
- 4 Elite Materials (5% Chance):
- Remaining elite materials after trading: 287.9−(28.79×3)≈201.53 elite materials.
- Total attempts with 4 elite materials: 201.53/4≈50.38 attempts.
- Expected epic gear pieces: 50.38×5%≈2.519 pieces.
- 4 Rare Materials (1% Chance):
- Total attempts with 4 rare materials: 1439.75/4≈359.93 attempts.
- Expected epic gear pieces: 359.93×1%≈3.59 pieces.
- Epic + 3 Elite Materials (28.75% Chance): 28.79×28.75%≈8.27 pieces.
- Total Epic Gear Pieces per Month
- Total Expected Epic Gear Pieces:
- Forging: ≈ 8.27 + 2.519 + 3.59 ≈ 14.38.
- From forging points: ≈ 6.91 pieces.
- Grand Total: 14.38 + 6.91 ≈ 21.29 epic gear pieces per month.
- Total Expected Epic Gear Pieces:
Sometimes, you can get unlucky and get fewer pieces. Sometimes, you will get lucky and get more. It is just how it works. For example, one time I got five epic gear pieces from five forging batches with only one epic material in it. The probability of that happening is around 0.2%:
Buying
Like many other things in Last Fortress, you can also purchase gear for real money.
You can:
- Directly purchase packs containing gear kits (Pack Shop, Weekly Special, or special offers that pop up occasionally).
- Those with epic gear are usually expensive ($50-$100).
- Get the Season Quest upgrade for additional rewards, including gear chests.
- Buy stuff during the Cumulative Top-up to get to the milestones with the gear chest reward.
- These are usually among the last ones, so you will need to spend quite a lot of $.
- And, of course, the hero-exclusive gear that goes for $150 a set. This is a robbery to ask this price for one in-game gear set, if you ask me.
Upgrading (Enhancing) Gear
Getting Materials
You can upgrade gear with Tin Blocks to unlock additional gear stats at certain levels. Epic gear also requires Electric Superchargers to be upgraded past level 15.
- Uncommon gear cannot be upgraded.
- Rare gear can be upgraded to level 5.
- 69 Tin Blocks (nice).
- Elite gear can be upgraded to level 15.
- 986 Tin Blocks.
- Epic gear can be upgraded to level 20.
- 2001 Tin Blocks and 24 Electric Superchargers.
Where you can get Tin Blocks:
- Disassembling gear: Each gear piece can be disassembled, returning a certain number of Tin Blocks. Here is what you should know about disassembling:
- To access the disassembling menu, do this: Hero → Tap\Click any hero → Tap\Click any gear slot → Tap\Click “Disassemble” in the lower left corner.
- You can select all gear pieces of a certain quality by pressing “lowest quality,” choosing the desired lowest quality, and pressing “quick selection.” Then, you can disassemble all selected items.
- Each gear piece gives a certain number of Tin Blocks based on its rarity:
- Uncommon — 2-3
- Rare — 4-6
- Elite — 20-30
- Epic — 30 + 1 Supercharger
- You will get all Tin Blocks you spend upgrading a gear piece up to level 15.
- Updated: Now, you can also turn on the auto-disassembling if you go to your Inventory → Gear → Disassemble tab → Tick the “Auto-Disassemble” option → Press the wrench icon to choose rarity.
- Enemy elimination during the personal armaments race: During the last two days of the week, there are four Personal Armaments Race events where you can get gear-related awards, including Tin Blocks.
- Expedition: By going through stations, you will get Tin Blocks as a reward. Plus, you will get a lot of low-rarity gear that you will be able to disassemble.
- Wheel of Gear event: You can try your luck to get gear-related awards, including Tin Blocks.
- Buying in packs: You can buy packs dedicated solely to Tin Blocks or containing Tin Blocks and some other gear-related items in Pack Shop.
Where you can get Electric Superchargers:
- Disassembling gear: When disassembling any epic gear piece, you will get one Supercharger.
- One of the main ways of getting them in the late game. Once you have epic gear on all of your active heroes, you can disassemble the redundant gear to get Superchargers.
- Weekly Trials: You can get 2 without paying.
- Night Before the War event: There are Superchargers among the last two Intel Score rewards, but it is not worth going for them unless you are late in the game and have lots of iron and z-coins to burn.
- Strongest Alliance: You get superchargers as part of the reward. The number is different for different placements. The event lasts for a month, and depending on your League and placement, you can get:
- Master: 12-20 Superchargers
- Diamond: 6-10 Superchargers
- Gold: 5-6 Superchargers
- Prestige Shop:
- Season Special – you can buy 15 superchargers for $50.
- Season Shop – you can buy 2 superchargers once a week for 100 Prestige Coins each. (recommended.)
- Zombie Annihilation:
- You can get one supercharger for 40 Zombie King’s Shins. (recommended.)
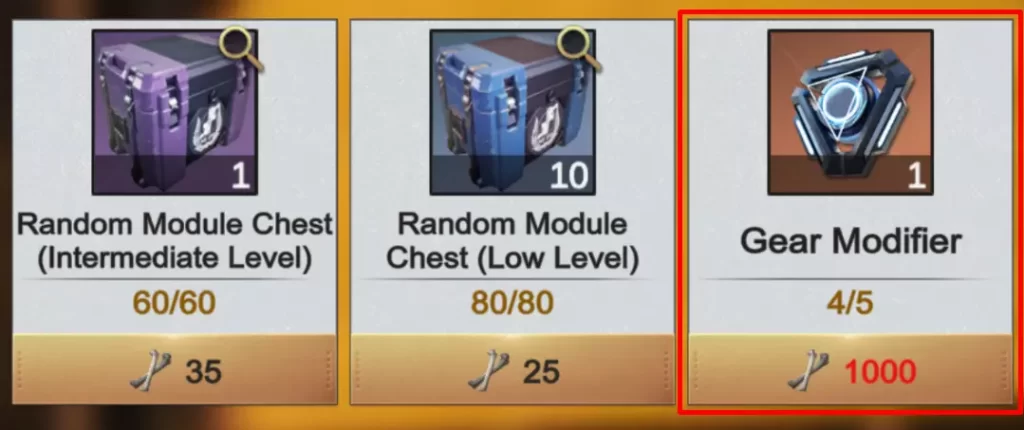
- If you want to focus on upgrading your gear to Master, exchange 1,000 bones for a gear modifier.
- Any event like this, where you can get superchargers for some points – get them, unless you can also get a modifier.
- You can get one supercharger for 40 Zombie King’s Shins. (recommended.)
- Buying in packs: There are dedicated and mixed packs that include Superchargers in the Pack Shop and Supply Station.
- Usually, these are not worth buying.
Upgrading
To access the upgrade menu, you can go to:
Item → Gear → Tap\Click the gear piece you want to upgrade → Tap\Click the yellow Gear button in the bottom left corner → Tap\Click the Enhance button to start upgrading.
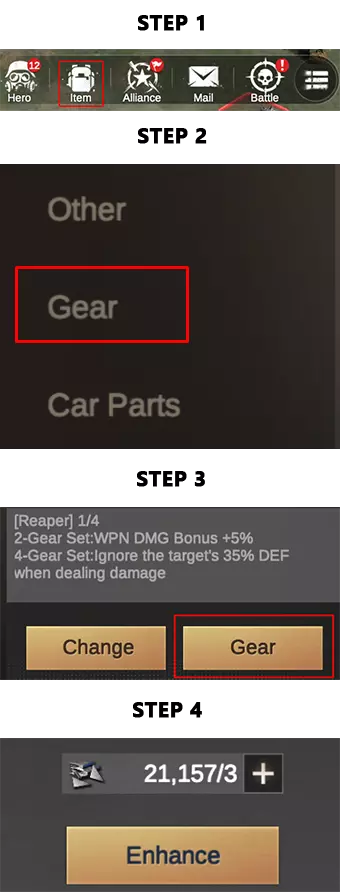
or
Hero → Tap\Click any hero → Tap\Click their gear slot → Tap\Click either their gear or any of the gear on the left side → Tap\Click the Enhance button → Tap\Click the Enhance button to start upgrading.
The higher the gear quality, the more stats the gear has:
- Uncommon gear offers only two grey stats.
- Rare gear has two grey and one blue stat.
- Elite gear has two grey, two blue, and one orange stat.
- Epic gear has two grey, two blue, and two orange stats.
- Master gear has two grey, two blue, and three orange stats
The stats get unlocked at certain gear levels:
- Blue 1 – level 5
- Blue 2 – level 10
- Orange 1 – level 15
- Orange 2 – level 20
- Orange 3 – level 30
Also, the higher the gear quality, the higher the starting values of each stat the gear has at level 0.
For example, the first stat of every head and armor piece is adding a certain number of AGI to the hero’s AGI. Based on the gear quality, the starting values are as follows:
- Uncommon +7
- Rare +9
- Elite +12
- Epic +14
Besides that, the first two stats increase with each gear level.
The first four stats (grey and blue) are the same for all gear pieces within their slot:
| Gear Slot | Stat 1 | Stat 2 | Stat 3 | Stat 4 |
|---|---|---|---|---|
| Weapon | +N primary hero stat (INT or STR) | +N Crit Rate | +N% of WPN (for STR) or TAC (for INT) DMG | +N% of INT or STR |
| Helmet | +N VIT | +N AGI | +N% HP | +N% AGI |
| Armor | +N AGI | +N VIT | +N% DEF | +N% VIT |
| Jewelry | +N primary hero stat (INT or STR) | +N Skill effect enhancement | +N% DMG Mitigation | +N% DMG Bonus |
The last two stats (orange) are random, but the pool of these stats is the same for all gear pieces within their slot:
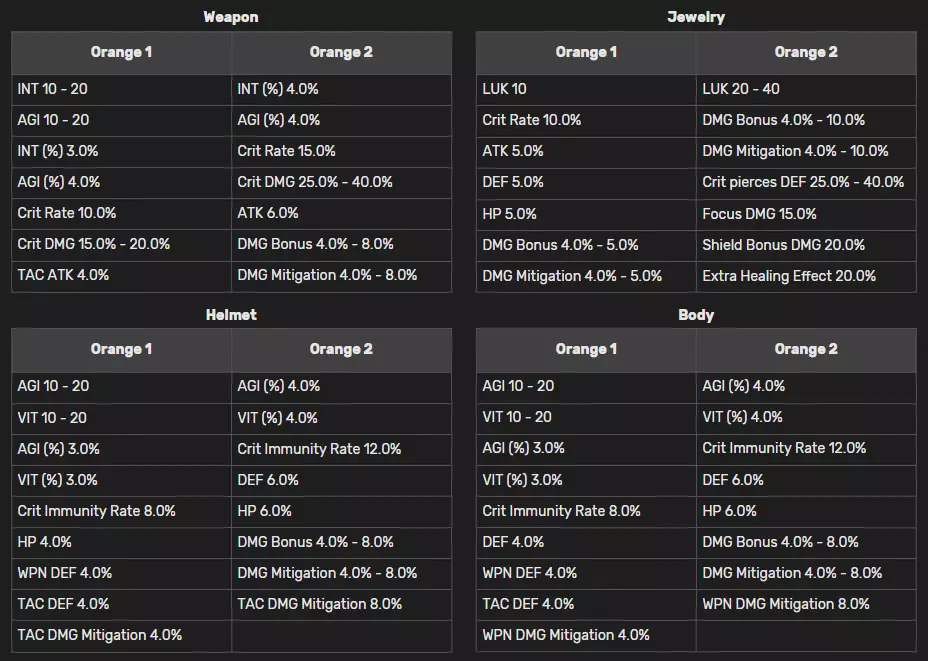
Source – https://last-fortress-underground.fandom.com/wiki/Gear/Stat_Table
Two things are randomized in a piece of gear with orange stats: the stat itself and its power (for some of the stats).
However, you can use Clean Energy to reroll the orange stat(s) of a gear piece containing it.
Imbuing Gear
You can access the menu where you can reroll the stats with Clean Energy like this:
Hero → Tap\Click any hero → Tap\Click on any gear slot of the hero → Tap\Click Imbue on the left bottom side → Tap\Click the gear piece you want to reroll → Tap\Click Imbue → Tap\Click Imbue again to start.
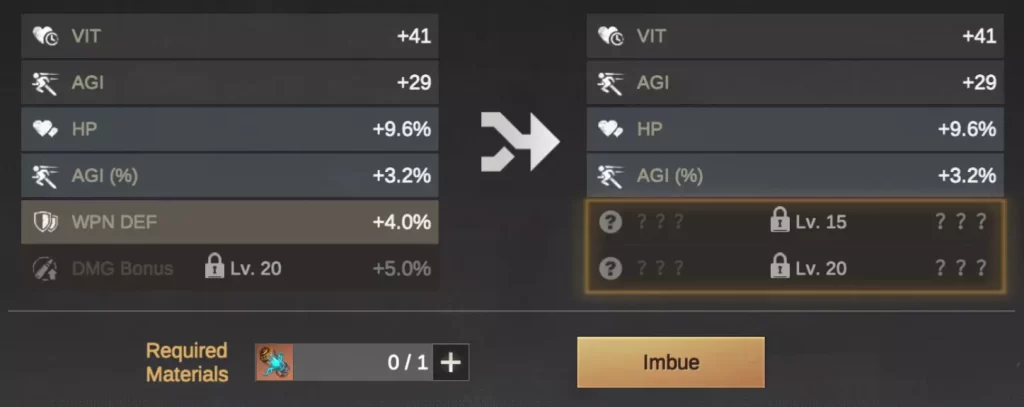
Once you press the last imbue button, you will spend one Clean Energy. Then, you will be presented with a choice to save the result or cancel the roll. In any of these cases, you will lose one Clean Energy.
For Master (red) quality gear, you reroll the 7th Master stat as well. The 7th stat is shown only after the gear reaches the Master quality.Usually, rerolling is the last stage of fine-tuning your gear. For example, you want a crit-focused hero. In such a case, you might want to reroll your weapon and jewelry pieces for the Crit Rate, Crit DMG, and Crit Pierces DEF stats.
Clean Energy is pretty hard to come by, and you can get it here:
- The Strongest Alliance: in this monthly event, you can get a decent number of Clean Energy depending on your League and placement.
- Master: 10-20
- Diamond: None
- Gold: None
- Regular Holiday events: often, Clean Energy will be among the rewards of one-time, holiday-related in-game events (Thanksgiving, New Year, etc.).
- Privilege Shop (VIP): Clean Energy becomes available once you reach SVIP 5 and 10.
- Buy in packs: One in the Pack Shop for $20, Three in Weekly Special of Supply Station for $50, in special offers related to gear.
Once you get your main heroes in sets, and each piece is at least level 15, you can look for minor improvements in the last orange stats. This is mainly applied to Elite gear, as Epic gear is scarce.
After you have some elite gear piling up from the expedition kits, try looking for epic gear with a better last stat than the one your heroes are currently wearing.
Here’s what you have to look for when choosing the first orange stat:
- Weapons
- Avoid AGI stat for tanks, as you usually want their AGI lower than your back-row heroes’ AGI.
- Only for S0-S4 meta.
- Crit Rate and Crit DMG for crit-oriented builds (especially for the Apocalypse set).
- The primary stat % is better than a flat number. You can get 20 maximum as a flat number, but you can get more with % because your primary stat will exceed 1000 at some point.
- As for the +% TAC\WPN ATK, I need to do some testing, as there is no information on how, for instance, INT would affect the hero’s TAC ATK. Hence, I am unsure if +3% of INT is better than +4% TAC ATK.
- Avoid AGI stat for tanks, as you usually want their AGI lower than your back-row heroes’ AGI.
- Helmet and Body
- Same with AGI here. Avoid AGI stat for tanks, as you usually want their AGI lower than your back-row heroes’ AGI during S0-S4.
- I don’t know how exactly crit immunity works, but I assume that once the attacking hero hits you with a crit, there is a chance that it will count as a normal attack, mitigating the crit damage.
- From the information out there, the difference between WPN DEF and WPN DMG mitigation is that the first one applies to your troops too, but that is also not 100% true, as there is not enough information on stats from the game devs.
- Hence, I aim for either VIT or DEF as they are more straightforward and are not focused only on one attack type.
- VIT might be better if you plan to wear the Alpha Bless set on someone or if the hero’s skills rely on max HP (Monica, Mira, Ada, etc.).
- Here, pick VIT or AGI % only if the stat of the hero is 650+. Otherwise, flat +20 is better.
- Jewelry
- LUK is usually the best option, as often, whoever fires their skill first can decide the battle’s outcome.
- Crit Rate is decent for crit-oriented builds (especially for the Apocalypse set).
- I don’t know for sure, but from the information I found, ATK is better than DMG Bonus as it increases troop damage too.
- But, I see a lot of players go for DMG Bonus. 🤷
- As for the defensive stats, DEF is, probably 🤷, better than DMG Mitigation because it also affects troops.
- HP might be better if you plan to wear the Alpha Bless set on someone or if the hero’s skill relies on max HP (Monica, Mira, Ada, etc.).
Here’s what you have to look for when choosing the first orange stat:
- Weapons
- DMG Bonus for damage dealers.
- DMG Mitigation for tanks\supports.
- Also, for Victoria. Her shield already gives her more than enough damage. The same goes for other gear slots.
- Helmet and Body
- DMG Bonus for damage dealers.
- DMG Mitigation for tanks\supports.
- Jewelry
- LUK – usually best stat, important for heroes like Casino, Monica, Heytex, etc., who, if go faster than the opponent’s, decide the battle outcome.
- DMG Bonus – for damage dealers.
- DMG Mitigation – for tanks\supports.
- Focus DMG – decent for Heytext.
- Extra Healing Effect – not sure if applies to shields. If so, would be decent on Bolton (only if you have his UW), Victoria (in combination with Bolton), Ada, Monica, etc.
Refining Gear to Master (Red quality)
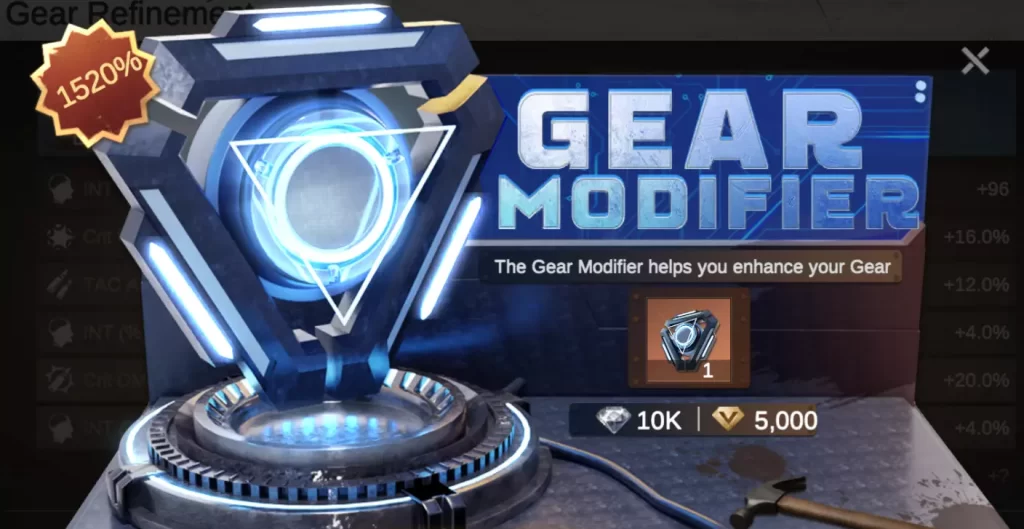
Update 1.309.001 brought us Gear Modifiers.
By using a Gear Modifier on a level 20 Epic gear piece, you can promote it to the Master (red) quality, increasing the maximum level cap to 30 and adding another orange stat to the piece, along with improved set bonuses.
The increased level cap means the first four stats will also be increased compared to level 20 epic gear.
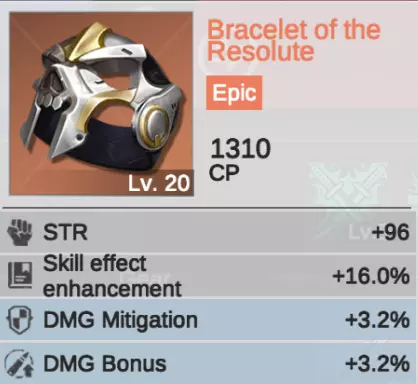
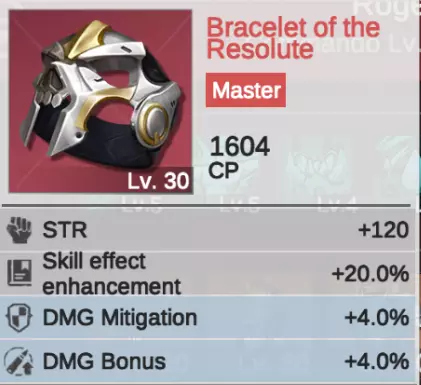
The third stat added by the Gear Modifier is either DMG Mitigation or DMG Bonus within the + 3-5% range.
As of now, you can either buy the Gear Modifier for $50 (sheesh).
You can also get a Gear Modifier from the other two events – Zombie Annihilation and Ruins Adventure.
In the Zombie Annihilation event, you need bullets to hunt zombies. Each hunt costs ten bullets, but you can (and should) only use the 90-bullet option for ten hunts. Although, when the Treasure Hunter bonus is active, the cost of a single hunt becomes nine bullets, so you can use all your remaining bullets without losing an additional hunt.
On average, ten hunts yield around 75 shins, so you will need to perform around 140 hunts to get 1,000 shins for the modifier, which is around 1,260 bullets.

In the Ruins Adventure event, you will need around 200 pickaxes to get three suits and three notebooks for one modifier. Remember that only pickaxes are stored in your inventory, so any other items you collect here will not transfer to the next event.
After you obtain the Gear Mofidier, you can go to Heroes => Choose the hero with the gear you want to upgrade => Choose the gear piece => Tap “Refine” => Tap “Refine” again


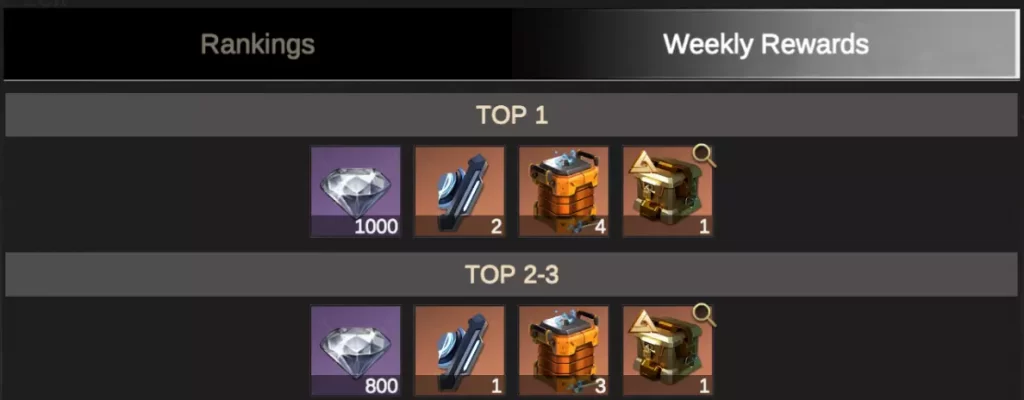
During the Fountain of Life dimension, you can get pieces of the Gear Modifier for the first, second, and third places. Five pieces can then be made into one Modifier. But, sadly, only big spenders will get to these places, so getting your Modifier here is almost impossible.
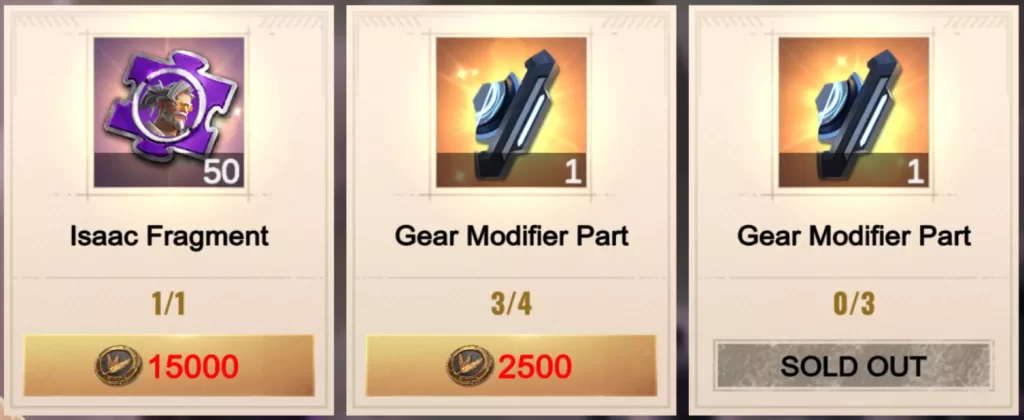
The best way of getting it is in the Doomed Land dimension, namely the Camp Shop. You will be able to easily assemble at least one Gear Modifier within one season of the Doomed Land dimension.
Here’s the table of set bonuses comparison – Normal vs. Master. Not all are known, so if you can help figure those out – message me.
Set Bonuses
| Set | 1st Set Bonus (2 items) | 2nd Set Bonus (4 items) | Unlocked |
|---|---|---|---|
| Reaper | → Normal: +5% WPN DMG Bonus → Master: +8% WPN DMG Bonus | → Normal: 35% enemy DEF ignored → Master: 50% enemy DEF ignored | Season 0 |
| Hurricane | → Normal: +5% TAC DMG Bonus → Master: +8% TAC DMG Bonus | → Normal: +15% Focus DMG → Master: +24% Focus DMG | Season 0 |
| Castle | → Normal: +5% DMG Mitigation → Master: +8% DMG Mitigation | → Normal: 30% chance to block 50% damage taken → Master: 40% chance to block 60% damage taken | Season 0 |
| Apocalypse | → Normal: +10% Crit Rate → Master: +15% Crit RATE | → Normal: +20% Crit Damage → Master: +30% Crit Damage | Season 1 |
| Death | → Normal: +6% ATK → Master: +10% ATK | → Normal: +20% DMG after defeating the target enemy → Master: +35% DMG after defeating the target enemy | Season 1 |
| Tough Wall | → Normal: +15% DEF → Master: +24% DEF | → Normal: +12% Defense when taking damage, stacks up to 5 times → Master: +18% Defense when taking damage, stacks up to 5 times | Season 2 |
| Heal | → Normal: +6% HP → Master: +10% HP | → Normal: +30% Healing and Shield effect → Master: +45% Healing and Shield effect | Season 2 |
| Resolute | → Normal: +0.2% ATK for every 1% HP lost → Master: +0.4% ATK for every 1% HP lost | → Normal: Immune to the first fatal damage, after which restores HP to 20% of the max HP and gives +25% DMG to the Hero's subsequent attack. → Master: Immune to the first fatal damage, after which restores HP to 30% of the max HP and gives +50% DMG to the Hero's subsequent attack. | Season 3 |
| Alpha Bless | → Normal: +5% Crit Immunity Rate for all Heroes in Lineup (does not stack) → Master: +8% Crit Immunity Rate for all Heroes in Lineup (does not stack) | → Normal: Each hero in the Lineup gains a shield of 5% of the max HP of the Hero wearing the Alpha Bless set at round 1 (stacks). Starting from round 6, all allied Heroes gain +5% crit rate for 5 rounds (does not stack). → Master: Each hero in the Lineup gains a shield of 6.5% of the max HP of the Hero wearing the Alpha Bless set at round 1 (stacks). Starting from round 6, all allied Heroes gain +10% crit rate for 5 rounds (does not stack). | Season 3 |
| Mental Control | → Normal: +3% HP, +3% DMG Mitigation → Master: +5% HP, +5% DMG Mitigation | → Normal: Every normal attack launched by the enemy has a 50% chance of landing on the wearer of Mental Control. → Master: Every normal attack launched by the enemy has a 80% chance of landing on the wearer of Mental Control. | Season 4 |
| Self-Healing | → Normal: +6% HP → Master: +10% HP | → Normal: At the beginning of each round, restores HP equal to 20% of the Hero's ATK, the effect will be doubled if the Hero's HP is lower than 50%. → Master: At the beginning of each round, restores HP equal to 35% of the Hero's ATK, the effect will be doubled if the Hero's HP is lower than 50%. | Season 4 |
| Super Core | → Normal: +7% DMG Mitigation → Master: +10% DMG Mitigation | → Normal: At the start of each round, +500 Focus for one of the Heroes in your Lineup. The effect will orderly loop from the Hero at position 1 to position 5 in the subsequent rounds. → Master: At the start of each round, +500 Focus for one of the Heroes in your Lineup and the Hero's DMG +5% and DMG Mitigation +5%, lasts 1 round. The effect will orderly loop from the Hero at position 1 to position 5 in the subsequent rounds. | Season 5 |
| Ripper | → Normal: +20% Normal Attack DMG → Master: +30% Normal Attack DMG | → Normal: Normal attacks cause bleeding, dealing 35% damage to the target for 2 rounds. → Master: Normal attacks cause bleeding, dealing 50% damage to the target for 2 rounds. | Season 6 |
| Spike | → Normal: +6% HP → Master: +10% HP | → Normal: When being attacked, redirects 15% of the DMG Taken to the attacker instead. → Master: When being attacked, redirects 24% of the DMG Taken to the attacker instead. | The Boys Event |
| Elite | → Normal: +5% Research Speed → Master: | → Normal: +15% Construction Speed → Master: | Exclusive $ |
| Scientist | → Normal: +5% Construction Speed → Master: | → Normal: +10% Research Speed → Master: | Exclusive $ |
| Smart Butler | → Normal: +30% Moving speed in the Fortress → Master: | → Normal: +150 Distribution Load → Master: | Exclusive $ |
| Justice | → Normal: Righteous Strike now targets all enemy targets. → Master: Bolton takes 5% less DMG, "Righteous Strike" now targets all enemy targets. | → Normal: When "Righteous Strike" is cast, all back-row enemies take 20% more DMG for 2 round(s). → Master: When "Righteous Strike" is cast, all back-row enemies take 30% more DMG for 2 round(s). | Exclusive $ |
| Blaze | → Normal: Benson's normal attack deal +50% WPN DMG to front-row targets and subject them to the Burning status. → Master: Benson's normal attack deal +75% WPN DMG to front-row targets and subject them to the Burning status. | → Normal: When casting a Focus Skill, if the target already has the Burning status, reduces the target's DMG Mitigation by extra 30%. → Master: When casting a Focus Skill, if the target already has the Burning status, reduces the target's DMG Mitigation by extra 45%. | Exclusive $ |
| Crimson | → Normal: For every 1 surviving enemy target, Roger ignores 5% DEF of the target when launching attacks. → Master: | → Normal: Whenever a hero (of any side) dies, Roger gains 100 point(s) of Focus, restores HP equal to 10% of his max HP, and deals 10% more DMG (stacks up to 30) in his subsequent attack. → Master: | Exclusive $ |
| First Aid | → Normal: While [Vital Hormones] remain effective, the damage taken by the target is reduced by 20%. → Master: While [Vital Hormones] remain effective, the damage taken by the target is reduced by 25%. | → Normal: When a Minuteman teammate causes the enemy to enter a Poisoned, Bleeding, or Burning status, 20% chance to make the hero gain +10% healing and +5% DMG Mitigation, stackable for up to 5 layers. → Master: When a Minuteman teammate causes the enemy to enter a Poisoned, Bleeding, or Burning status, 30% chance to make the hero gain +15% healing and +7% DMG Mitigation, stackable for up to 5 layers. | Exclusive $ |
| War Ender | → Normal: +10% ATK → Master: +15% ATK | → Normal: When Heytex successfully kills an enemy hero, it gains +20% DMG, with its teammates gaining +10% DMG, lasting till the battle ends (2 layers max). → Master: When Heytex successfully kills an enemy hero, it gains +35% DMG, with its teammates gaining +15% DMG, lasting till the battle ends (2 layers max). | Exclusive $ |
| Agent | → Normal: +6% ATK → Master: +10% ATK | → Normal: When Dylan casts "Deadly Stab", an additional attack will be launched causing 50% WPN DMG. If this attack hits any enemy whose HP is lower than 20%, the target will be killed instantly. → Master: When Dylan casts "Deadly Stab", an additional attack will be launched causing 75% WPN DMG. If this attack hits any enemy whose HP is lower than 20%, the target will be killed instantly. | Exclusive $ |
| Puppet Bunny | → Normal: Kobayakawa deals 15% more DMG against targets subject to Burning status. → Master: Kobayakawa deals 22.5% more DMG against targets subject to Burning status. | → Normal: When the target of "Flaming Feast" is in the front row, or the enemy has no front-row heroes, deals 3.6 times the damage to the target. → Master: When the target of "Flaming Feast" is in the front row, or the enemy has no front-row heroes, deals 4 times the damage to the target. | Battlefield Island |
| Rivets | → Normal: At the start of round one, Enrique casts "Metalhead" once. → Master: Enrique takes 5% less DMG, at the start of round one, Enrique casts "Metalhead" once. | → Normal: When Enrique casts a Focus skill, his teammates will gain +30% Crit Rate for 2 rounds. → Master: When Enrique casts a Focus skill, his teammates will gain +45% Crit Rate for 2 rounds. | Exclusive $ |
| Heavy Metal | → Normal: +30% Crit DMG → Master: +45% Crit DMG | → Normal: +20% Focus DMG. When a hero dies, Blanche restores 200 points of Focus and increases her Crit Rate by 5%. → Master: +30% Focus DMG. When a hero dies, Blanche restores 300 points of Focus and increases her Crit Rate by 10%. | Exclusive $ |
| High Voltage | → Normal: +12% Crit Immunity Rate → Master: +18% Crit Immunity Rate | → Normal: When casting a Focus Skill, subjects the enemy with the lowest HP to the Chained status. When the hero is being attacked, DMG Mitigation increases by 12% for 1 round, stacks up to 3 layers. → Master: When casting a Focus Skill, subjects the enemy with the lowest HP to the Chained status. When the hero is being attacked, DMG Mitigation increases by 18% for 1 round, stacks up to 3 layers. | Exclusive $ |
| Trick | → Normal: +5% DMG Mitigation → Master: +10% DMG Mitigation | → Normal: When the counter-strike is triggered, reduce the DMG dealt by the enemy by 10%, lasting 2 rounds (2 layers max). → Master: When the counter-strike is triggered, reduce the DMG dealt by the enemy by 15%, lasting 2 rounds (2 layers max). | Exclusive $ |
| Echo | → Normal: At the beginning of round one, Chu casts "Death Symphony" once. Every time "Call of Death" is triggered, additionally restore HP equal to 50% of Chu's TAC ATK for the teammate with the lowest remaining HP. → Master: At the beginning of round one, Chu casts "Death Symphony" once. Every time "Call of Death" is triggered, additionally restore HP equal to 75% of Chu's TAC ATK for the teammate with the lowest remaining HP. | → Normal: Applies the reflecting effect two more times in a normal attack, each dealing 25% TAC DMG, the effect will target those under an echoing status first, if any. → Master: Applies the reflecting effect two more times in a normal attack, each dealing 50% TAC DMG, the effect will target those under an echoing status first, if any. | Exclusive $ |
| Tycoon | → Normal: +7% DMG Mitigation → Master: +10% DMG Mitigation | → Normal: Gains 300 Foucs at the start of a battle. When Casino casts "Try the Luck" and wins, he restores 100 Focus. → Master: Gains 300 Focus at the start of a battle. Casino takes 5% less DMG. When Casino casts "Try the Luck" and wins, he restores 100 Focus. | Exclusive $ |
| Detonation | → Normal: At the beginning of round one, Quinn gains 1000 Focus, lasting 1 round. → Master: At the beginning of round one, Quinn gains 1000 Focus and 100% more Initiative, lasting 1 round. | → Normal: Every 5 rounds, Quinn restores 500 Focus for the teammate with the lowest Focus. → Master: Every 4 rounds, Quinn restores 500 Focus for the teammate with the lowest Focus. | Exclusive $ |
| Guardian INT | → Normal: All teammates receive 15% more healing effect. → Master: All teammates receive 22% more healing effect. | → Normal: At the end of each round, applies a shield that offers (5+7*X)% of Harman's TAC ATK to all teammates (X refers to the number of rounds at the moment). → Master: At the end of each round, applies a shield that offers (10+10*X)% of Harman's TAC ATK to all teammates (X refers to the number of rounds at the moment). | Exclusive $ |
| Sand | → Normal: When launching a normal attack or casting a Focus Skill, restore some HP for the hero equal to 14% of the damage dealt by the attack or Skill. → Master: When launching a normal attack or casting a Focus Skill, restore some HP for the hero equal to 21% of the damage dealt by the attack or Skill. | → Normal: The skill "Rapid Arrows" will now target all back-row enemies. → Master: +10% Focus skill damage, the skill "Rapid Arrows" will now target all back-row enemies. | Exclusive $ |
| Skeleton | → Normal: +5% INT → Master: | → Normal: At the start of the battle, the enemy targets with the highest INT, STR, and AGI will be Cursed, reducing each of the three attributes by 8% for 2 round(s). The enemy with the lowest INT will permanently take 8% more DMG → Master: | Exclusive $ |
| Fate | → Normal: At the end of each round, restore HP equal to 15% of the hero's lost HP. → Master: | → Normal: Every time taking incoming DMG from the enemy (multi-strike damage will be counted as one incoming damage), apply 1 layer of Endurance effect to the hero (up to 5 layers), upon reaching the maximum stackable layers, the Endurance effect will use up all layers and apply a 20% healing boost and 20% ATK bonus to Titan, lasting till Titan's move ends. → Master: | Exclusive $ |
| Spirit | → Normal: The Corvine Curse skill can target 1 more enemy. → Master: The Corvine Curse skill can target 1 more enemy. | → Normal: When the Seed of Life blooms, the enemy hero being targeted will take 20% more DMG, lasting 1 round. → Master: When the Seed of Life blooms, the enemy hero being targeted will take 25% more DMG, lasting 2 rounds. | Exclusive $ |
| Guardian STR | → Normal: At the beginning of round one, Buri casts "Link of Life" once. Every time "Link of Life" is cast, the share of DMG that can be split will be increased by 10%. → Master: At the beginning of round one, Buri casts "Link of Life" once. Every time "Link of Life" is cast, the share of DMG that can be split will be increased by 20%. | → Normal: When your hero receives fatal damage, 1 point of HP will be preserved, with 100% DMG Mitigation gained, lasting till the round ends (can only be triggered once in a battle, if the teammate triggering the effect wears four pieces of the [Resolute] set, the effects of both sets will be triggered, with the teammate being exempt from death only once). → Master: Buri takes 5% less DMG, when your hero receives fatal damage, 1 point of HP will be preserved, with 100% DMG Mitigation gained, lasting till the round ends (can only be triggered once in a battle, if the teammate triggering the effect wears four pieces of the [Resolute] set, the effects of both sets will be triggered, with the teammate being exempt from death only once). | Exclusive $ |
| Breeze | → Normal: +10% HP. → Master: +15% HP. | → Normal: At the start of the battle, all teammates gain 1 layer of Reviving effect. → Master: At the start of the battle, all teammates gain 2 layers of Reviving effect. | Exclusive $ |
| Duke | → Normal: All Watchers in the Lineup deal +4% DMG. → Master: | → Normal: Every time a teammate takes action, gain 1 layers of the Gentleman effect, with each layer increasing the DMG Mitigation by 2% (10 layers max), all layers will be cleared when reaching the limit, while making the hero's subsequent attack come with a Stunning effect and increasing the hero's DMG Mitigation by 20%, lasting 1 round. → Master: | Exclusive $ |
| Wolf | → Normal: At the start of each round, 30% chance to lift the hero's Poisoned, Burning, and Bleeding statues. → Master: At the start of each round, 50% chance to lift the hero's Poisoned, Burning, and Bleeding statues. | → Normal: At the start of each round, gains 2 layers of Pledge effect, with each layer increasing the DMG by 2% (5 layers max), if 5 layers of Pledge effect are stacked when taking fatal damage, all Pledge layers will be cleared, and the hero will be exempted from death this time, with 20% of the max HP restored. At the start of the battle, gains 2 layers of the effect, the first time your team enters the Poisoned, Burning, or Bleeding status, gains 1 layer of the effect. → Master: At the start of each round, gains 2 layers of Pledge effect, with each layer increasing the DMG by 3% (5 layers max), if 5 layers of Pledge effect are stacked when taking fatal damage, all Pledge layers will be cleared, and the hero will be exempted from death this time, with 30% of the max HP restored. At the start of the battle, gains 2 layers of the effect, the first time your team enters the Poisoned, Burning, or Bleeding status, gains 1 layer of the effect. | Exclusive $ |
| Execution | → Normal: Ignores 20% DEF of the target in attacks → Master: Ignores 30% DEF of the target in attacks | → Normal: If Galande kills the target by an action, 35% chance for him to make one more additional move in the subsequent round. → Master: If Galande kills the target by an action, 50% chance for him to make one more additional move in the subsequent round. | Exclusive $ |
| Drone | → Normal: Each round the drone is generated, 30% chance to generate an additional one. → Master: | → Normal: At the beginning of each round, command the drone to apply a shield to the teammate with the highest ATK, making the recipient deal 20% more DMG for 2 rounds (does not stack). → Master: | Exclusive $ |
| Combat Master | → Normal: +8% TAC DMG → Master: +10% TAC DMG | → Normal: Every time Victoria gains a shield, Victoria deals +5% DMG in the subsequent attack (3 layers max). → Master: Every time Victoria gains a shield, Victoria deals +5% DMG in the subsequent attack (5 layers max). | Exclusive $ |
| Executioner | → Normal: Macklin's "Skilled Potshots" will be enhanced, his "Calm Pursuit" will target back-row enemies first, if any. The smoke grenade will deal DMG equal to 5% of the enemy's max HP (but not exceeding 200% of Macklin's TAC ATK). "Sky Shot" will target the enemies marked by bounty markers first, if any. → Master: Macklin's "Skilled Potshots" will be enhanced, his "Calm Pursuit" will target back-row enemies first, if any. The smoke grenade will deal DMG equal to 7% of the enemy's max HP (but not exceeding 250% of Macklin's TAC ATK). "Sky Shot" will target the enemies marked by bounty markers first, if any. | → Normal: Every time Macklin gains the bounty effect, 1 random teammate will receive the same bounty effect. When Macklin triggers all 5 types of effects, he will attach bounty markers to all enemies once more. → Master: Every time Macklin gains the bounty effect, 1 random teammate will receive the same bounty effect. When Macklin triggers all 5 types of effects, he will attach bounty markers to all enemie sonce more. Macklin's normal attack DMG +10%. | Exclusive $ |
| Cat Soul | → Normal: Every time she takes action, reduces the target's DMG Mitigation by 5% (3 layers max). When stacking limit is reached, clears all layers while subjecting the target to the Coma status for 1 round. → Master: Every time she takes action, reduces the target's DMG Mitigation by 7% (3 layers max). When stacking limit is reached, clears all layers while subjecting the target to the Coma status for 1 round. | → Normal: Every time Kelly casts a Focus Skill, her Focus Skill DMG is increased by 10% (4 layers max). → Master: Every time Kelly casts a Focus Skill, her Focus Skill DMG is increased by 15% (4 layers max). | Exclusive $ |
| Concerto | → Normal: Each round, the first damage Isaac takes is reduced by 30%. → Master: Each round, the first damage Isaac takes is reduced by 50%. | → Normal: When Isaac fights back, he deals 30% more DMG and applies the Variation effect to 1 more enemies. → Master: When Isaac fights back, he deals 50% more DMG and applies the Variation effect to 1 more enemies. | Exclusive $ |
| BabyBear | → Normal: When casting Shielding Barrier, inflicts Bleeding on the enemy's front row, dealing DMG equal to 3% of their remaining HP per round (no more than 300% of the Yolanda's TAC DMG), lasting 2 rounds. → Master: ??? | → Normal: While Shielding Barrier is in effect, if Yolanda takes DMG equal to 50% of her max HP in a single round, increase her DMG Mitigation by 75% for 1 round. Each time the effect is triggered, its bonus will drop by 20%. → Master: ??? | Exclusive $ |
| Flare | → Normal: Initiative +5%; Scythe Chain will attack the enemy with the highest shield value first. → Master: ??? | → Normal: When Diesel casts Scythe Chain, additionally deals 100% WPN DMG to the enemy target. → Master: ??? | Exclusive $ |
| Watchtower | → Normal: Deals 20% more DMG in normal attacks. → Master: Deals 30% more DMG in normal attacks. | → Normal: Backline Barrage now targets back-row enemies. → Master: +8% TAC ATK, Backline Barrage now targets back-row enemies. | The Boys Event |
| Leader | → Normal: Shield effect increased by 20% → Master: Shield effect increased by 30% | → Normal: If there are four or more Spacetime Travelers in the lineup, casting Blustery Defense will grant the Spacetime Travelers in the lineup a shield with 100% more WPN ATK. → Master: If there are four or more Spacetime Travelers in the lineup, casting Blustery Defense will grant the Spacetime Travelers in the lineup a shield with 150% more WPN ATK. | The Boys Event |
| Dazzle | → Normal: +10% Initiative → Master: +15% Initiative | → Normal: +20% more DMG with "Starlight's Blast" and attack a second random target. → Master: +35% more DMG with "Starlight's Blast" and attack a second random target. | The Boys Event |
| Supersonic | → Normal: In the first round, for every enemy that has an Initiative lower than that of A-Train, A-Train will gain 50 Focus. → Master: In the first round, for every enemy that has an Initiative lower than that of A-Train, A-Train will gain 100 Focus. | → Normal: If A-Train is the first to attack in the round, he deals 20% more DMG. → Master: If A-Train is the first to attack in the round, he deals 30% more DMG. | The Boys Event |
| Former Leader | → Normal: At the beginning of each round, gains 3% of the lost HP for every layer of "determination" he has. → Master: At the beginning of each round, gains 5% of the lost HP for every layer of "determination" he has. | → Normal: Radiation Blast now targets all enemies. → Master: Soldier Boy's healing effect increases by 5%, Radiation Blast now targets all enemies. | The Boys Event |
| Psycho | → Normal: For the first 2 rounds of combat, gains 100% more Focus with the skill "Two-Faced". → Master: For the first 3 rounds of combat, gains 100% more Focus with the skill "Two-Faced". | → Normal: Laser Eyes now target all enemies. → Master: Homelander gains 5% DMG Bonus, Laser Eyes now target all enemies. | The Boys Event |
Using Gear
Now that you know more about obtaining and upgrading gear, let’s talk about how to use it (yay).
The game has a rough hero division by the role the hero has. It’s roughly the same when it comes to gear.
There are sets for front-row heroes that must be tanky:
- Castle (S0)
- Tough Wall (S2)
- Mental Control (S4)
- Self-Healing (S4)
- Super Core (S5)
Next, there are sets for damage dealers:
- Reaper (S0)
- Hurricane (S0)
- Apocalypse (S1)
- Death (S1)
- Resolute (S3)
And finally, for supports:
- Heal (S2)
- Alpha Bless (S3)
- Self-Healing (S4)
- Super Core (S5)
You can learn more about hero roles and positions in a lineup here.

Using Gear for Combat Heroes
Gear sets can be either INT or STR-focused. The easiest way to understand what hero stat is the primary one is to do the following:
- Go to the hero menu
- Tap\Click the hero
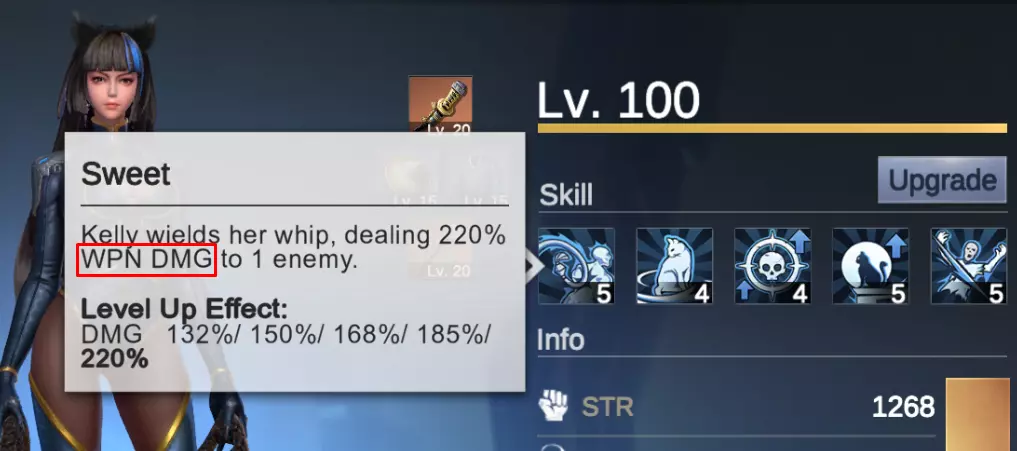
- Tap\Click the first skill
- If it says “WPN ATK” or “WPN DMG,” the primary stat of that hero is STR, so it benefits more from STR gear.
- If it says “TAC ATK” or “TAC DMG,” the primary stat is INT.
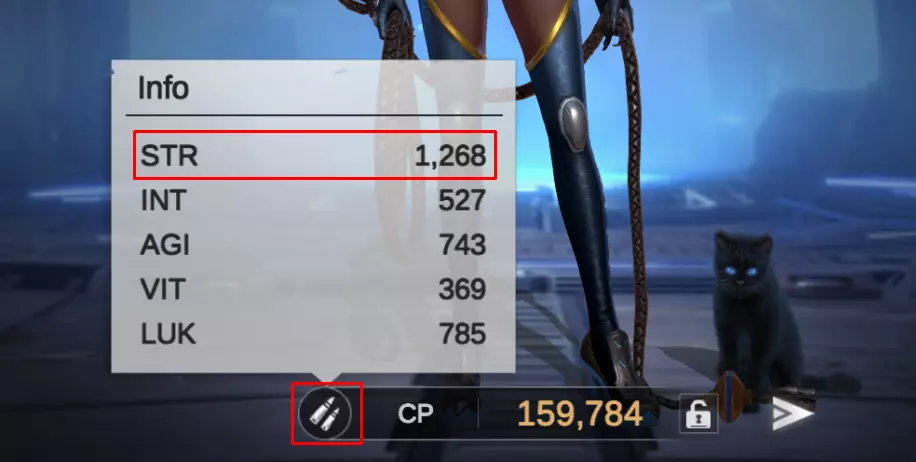
There is another way:
- Go to the hero menu
- Tap\Click the hero
- Tap\Click a small bullet icon near “CP” at the bottom
- The highest stat number indicates the primary stat of the hero
If we generalize, you would determine which set is beneficial for the hero based on the set effects:
- Anything with DMG, Crit, and ATK bonuses would fit a damage dealer.
- Anything with DEF, HP, and Mitigation bonus would fit a tank.
- Anything with Heal or Lineup buffs would benefit supports.
However, you can use non-tank heroes in the front row to get a faction bonus, buff your lineup, or debuff the enemy. In such a case, you can use tank gear on such heroes for them to be able to soak some damage and actually use their skills. For example, you can use Suzuki Ren to debuff the enemy, Park Ji-Mi to shield your lineup, etc.
Hope the list below will help you understand which gear is best for which hero.
During S0, the choice is little. You have three sets, and things are pretty straightforward:
- Reaper gear goes to STR damage dealers (Kelly, Kin Ogawa, Blanche, etc.) and, optionally, STR supports in back-row positions (Betty and Park Ji-Mi).
- Hurricane goes to INT damage dealers (Laurel, Rebecca, Marlen, etc.) and INT supports in back-row positions (Suzuki Ren, Alisa, Jessie).
- Castle goes to front-row tanks. INT Castle to heroes like Harman and Roland, STR Castle to Lunn, Enrique, Irma, etc.
During S0, your first priority is to have your main lineup equipped with the best gear. But don’t rush to upgrade any epic gear past level 15 — save up some of those Chargers.
When S1 comes, you get two new sets:
- Apocalypse — A crit-focused set, good for single back-row attackers like Kelly, Rebecca, and Blanche. Also, it is decent on AOE attackers like Elaine or Benson.
- Death — This one is also recommended for back-row attackers (especially Galande), but if the hero wearing the set does not kill the enemy hero, the second set effect is pretty much wasted.
- When wearing on Galande (or any other back-row-focused hero), tune his LUK stat so that his turn is after another heavy hitter like Kelly or Rebecca to secure the kill.
S2 brings yet two more sets:
- Tough Wall — I swapped all my Castle gear on tanks to this, as it is more consistent, as Castle’s second stat is luck based. But if you get lucky, Castle gear can be better 🙂
- Heal — Perfect for healers and shielders like Alisa, Jessie, and Park Ji-Mi.
- It might be viable for Roland, as he has both shielding and healing skills. A bit worse on Harman, but still worth trying.
As for S3 and S4 gear:
- Resolute — This one has been reworked a couple of times. The full-set effect is useful if you can either heal the hero wearing the set or perform a skill attack thanks to the saving effect. This effect is worthless if you can’t do any of those things. Good versus Galande, as his second attack won’t be triggered. Wear on your AOE heroes – Heytex, Elaine, Benson, etc.
- Also, having resolute gear results in much fewer troop KIA during base and zombie attacks.
- In late-game, this is the best gear for damage dealers as of now.
- Alpha Bless — This one is good to have on a support hero. Note that the effects of this set do not stack, which means only one hero in the lineup should wear it.
- Looks like a decent set to have versus AOE lineups.
- I see people stacking this gear for Victoria and Casino-centered builds. But the effect says that it does not stack, so I assume multiple sets in one lineup are not effective.
- Mental Control — Should be worn by tanks. Still, it can be inconsistent, as it is possible that the second effect won’t trigger at all if you’re unlucky. Can be a counter to lineups with Kelly and Galande (at least for non-skill attacks). Put the tank wearing it on the back to distribute the damage more evenly among your heroes.
- Casino-centered builds can get by without this set, as Casino’s second ability is (sort of) similar in effect.
- Self-Healing — Decent on back-row damage soakers and front-row tanks. Try on Mira or Titan.
- Note that shield-hp is not real HP, so even if your hero gets shielded past half of max HP when your real HP is less than 50%, the healing effect will still be doubled.
Season 5 brings only one new set:
- Super Core — An interesting one. Have a support wearing it or an off-tank. Ideally, it should be used on someone with high LUK to ensure the effect gets triggered. This is an essential gear set, allowing your heavy hitter (like Heytex or Elaine) fire their skill very early. For that, place them in position one and provide them with Resolute gear.
There is also only one new set in Season 6:
- Ripper — Should be decent in a lineup with damage-over-time (DOT) heroes (damage over time). Benson and Fuji are such heroes, for example. Also, if Buccaneer’s counter-attack is considered a “normal attack,” it might be decent on him. It also works for the flamethrower APC weapon. Kobayakawa is a must if you decide to build a DOT lineup.
- Used often on Chu, as her normal attack deals damage to multiple enemy heroes.
You should also note that a fully upgraded season 0 epic set can be better than an elite set from later seasons.
Although you can mix sets, I think you get the most benefits from the second set effect. I have not tested things enough to see if there are any decent combinations to consider. And if there are any, they should be hero-specific.
Late-game build
Starting from season five, you will see the following gear used in most high-level lineups:
- Mental Control – At least one tank would have it. Helps you distribute damage more evenly, putting the tank in the back (position three or five – depending on the tank’s skill usefulness). Also helps to soak Kelly’s, Galande’s, and Rebecca’s regular attacks.
- Used less often after assembling Victoria + Bolton or Victoria + Monica lineups.
- Super Core – This is a must-have. Put it on your second tank or support, front-row heroes that is. Your Heytex or Elaine will be then in position one, using their skill very early in the battle.
- Resolute – Resolute on everyone else. It is this good, yes. However, if you have a level 20 epic reaper set and a level 15 elite resolute set, the reaper set might be a better option until you get epic resolute gear.
- This is the best general set for damage dealers so far.
- Also good for Monica and Ada.
- Alpha Bless – A decent option for a support hero, as it provides a shield to all heroes, defense from crits, and a crit rate bonus.
- Used for Victoria-centered builds.
- Heal – use on Victoria and\or Boltton (with UW) for big shield bonuses.
Using Gear for Solari Heroes
Below, I write only about the gear aspect of Solari heroes. Read my Solari Heroes Guide for more information on production heroes.
There are some exclusive Solari gear sets (shown here), but they are 1) not worth buying and 2) have not even been sold in the game for some time.
You can also wear combat gear on Solari (worker) heroes.
But why would you do that?
First of all, you do that only when you have all your lineups equipped with gear of at least elite rarity, and each gear piece is level 15.
As for “why,” the gear you equip will add stats that will slightly increase the output of the facilities the Solari heroes are assigned to.
When you tap\click on a facility and press “Work,” there will be a text “+N Something for every N point(s) of STAT.” Hence, you can see how the stat affects the effectiveness of the facility.

Note: even if it says, for example, +1 Stone Output for every 40 points(s) of LUK, every point of LUK will add slightly to the stone output, not only batches of 40.
Here’s the list of all facilities and how the Solari stats affect them.
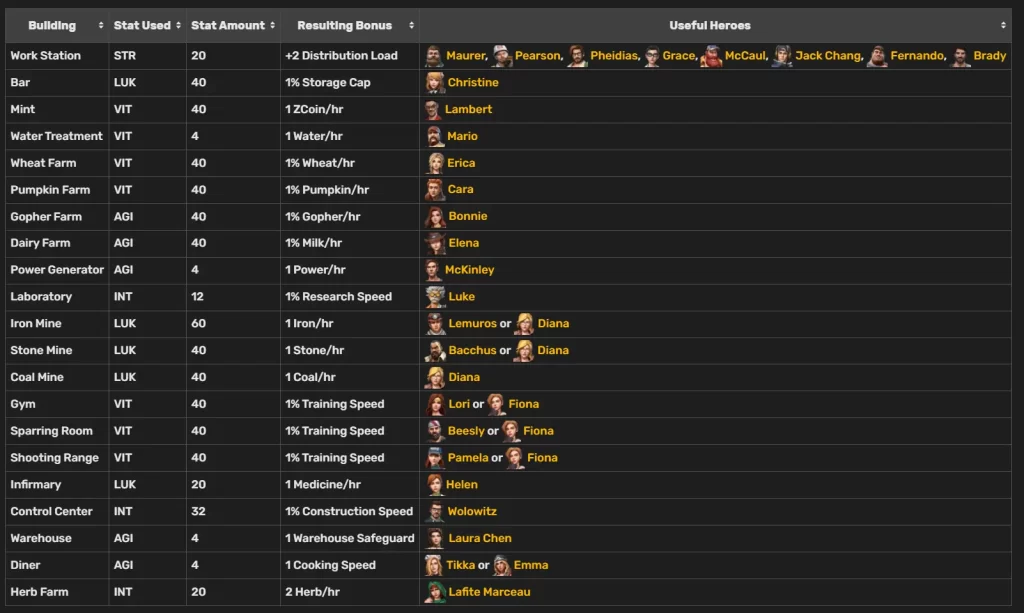
Source – https://last-fortress-underground.fandom.com/wiki/Optimizing_Production_Buildings
If you purchase N.A.T.E., the Distribution Load in work stations becomes irrelevant, so you don’t have to put gear or level up the work station heroes. The same goes for the Storage Cap in the Bar.
However, if you, for instance, have nothing to build at one point, you can use your worker heroes at a Mint. If you do so, they should equip gear with the Mint-related stats.
In all other cases, it is worth increasing the stats of Solari heroes with gear and leveling up.
If you have spare Ripper gear available, use it for Solari heroes as Ripper gear has higher main stats.Besides facilities, a few Solari hero skills are affected by the hero’s stats. They are:
- Pearson’s fourth skill — Increase Construction Speed by 1% for every X points of STR
- Christine’s (Bar) fifth skill — +X Memento Coins for every 40 points of LUK
- Luke’s fourth skill — +1% for every X points of INT
- Wolowitz’s fourth skill — For every X points on INT, the Construction Speed is increased by an additional X% (this one is good)
What should you prioritize in the early stage of the game?
I would say this was the priority in terms of Solari stat increase:
- Construction Speed
- This one is the most important because the higher you go regarding facility level, the more ridiculous the building time becomes, especially if you don’t have Pearson.
- Training Speed
- As you get to higher troop tiers, the time to train them grows exponentially. So, after fighting another alliance, you can get troops back faster.
- It will take you fewer troop speed-ups to train your troops, which will be beneficial during the Alliance Duel training day.
- Power
- You need power at all times: for research and using “Rapid” in your Mints.
- Z-coin
- Always needed for research.
- Research
- Not as crucial as research speed-ups are plenty in this game, but it is nice to have.
- Food
- Useful to exchange for recruitment points in the trade center occasionally.
- Used for alliance donations.
- Everything else
Here’s what pieces of gear you should use for different stats:
- STR — STR Weapon and STR Jewelry
- INT — INT Weapon and INT Jewelry
- AGI — Helmet and Armor (Ideally with orange slots for AGI) + The orange slots of Weapon
- VIT — Helmet and Armor (Ideally with orange slots for VIT).
- LUK — Orange slots of Jewelry
I didn’t bother putting gear and leveling up my Solari heroes until I reached level 20 of my center and facilities.
This is pretty much all you have to know about hero gear in Last Fortress: Underground. If you have questions and\or suggestions, you can find the ways to contact me on the About page on this site. Thanks for reading!