“Boarilliant guard’s here! Is there’s anything ask me to help?”
Overview

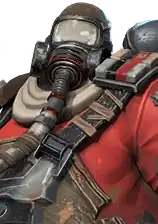
Yolanda
Boarilliant Guard
 Minutemen
Advanced Elite
Tank
Support
Minutemen
Advanced Elite
Tank
Support
1: Primary tank slot. Absorbs attacks first, maximizing Emergency Repair healing procs and Pulse Blaster counterattack triggers.
2: Secondary tank slot. Works in dual-tank setups where another hero (Buri, Bolton) occupies pos 1.
3: Off-tank position. Shielding Barrier still functions but receives fewer attacks, reducing counterattack and healing value.
Yolanda is a barrier-based counter-tank who generates persistent shields that enable counterattacks, self-healing, and stacking DMG mitigation, making her progressively harder to kill as fights extend. Her Nuke Pulse Launcher ultimate weapon applies Burning on every attack and counterattack while granting a round-1 barrier and taunt, turning her into a DOT-applying frontliner for Minutemen status compositions. BabyBear exclusive gear adds Bleeding to her barrier uptime, making her a passive dual-DOT source that feeds Ivanov’s detonation without spending backrow action economy.
Pros & Cons
- Shielding Barrier enables counterattacks (100% TAC DMG, 25% stun chance), dealing damage and disrupting enemies while tanking.
- Emergency Repair restores 30% of enemy ATK as HP per hit received, providing strong passive self-sustain.
- Resistance Armor stacks +3% DMG mitigation per heal (max 5 stacks = +15%), making her progressively harder to kill.
- BabyBear exclusive gear inflicts Bleeding on enemy front row (4% remaining HP/round), feeding DOT chains without spending actions.
- Nuke Pulse Launcher UW applies Burning (150% TAC DMG) on all attacks/counterattacks and provides round-1 barrier + taunt with +30% DEF.
- Barrier must be active for counterattacks and Pulse Blaster to function — if barrier is stripped or expires, she becomes a passive tank.
- INT-based damage on a Defender means her counterattack and burn damage scale with INT (594), not her higher AGI (894).
- No team-wide damage buff or carry potential — purely a tank/support who enables teammates rather than dealing significant damage herself.
- Vulnerable to sustained high-DPS lineups that can burn through BabyBear’s 4pc emergency DMG mitigation triggers.
Skills
Applies a [Shielding Barrier] lasting 3 round(s) to the hero; while the Shielding Barrier is in place, restores 2.5/3/3.5/4/5% of the hero’s lost HP for the hero herself each time an enemy or teammate’s action ends.
Each time the hero takes damage, if the hero does not die, restores some HP equal to 15/18/21/24/30% of the enemy’s ATK for the hero.
Each time receiving healing, gains a layer of [Armor]; each layer of [Armor] grants the hero +1.5/1.8/2.1/2.4/3% DMG Mitigation (5 layers max).
While the [Shielding Barrier] is in effect, each time the hero takes damage, launch a counterattack against the enemy, dealing 50/60/70/80/100% TAC DMG, with a 25% chance to Stun the enemy for 1 round.
The hero’s HP +5/6/7/8/10%, DMG Mitigation +5/6/7/8/10%.
Gear
BabyBear is best-in-slot and defines Yolanda’s role in DOT compositions. Super Core is the standard tank accelerator from pos 1. Castle and Tough Wall provide raw defensive stats. Self-Healing amplifies her self-sustain loop. Resolute is a fallback for death immunity against burst-heavy opponents.
Exclusive set. 2pc inflicts Bleeding on enemy front row (4% remaining HP/round, max 300% TAC DMG) for 2 rounds while Barrier is active. 4pc grants +90% DMG mitigation for 1 round if she takes 50% max HP damage in a single round (drops 20% per subsequent trigger). Transforms her from a passive tank into a DOT contributor.
#1 Best


+3% Focus per action taken. From pos 1, Yolanda acts frequently (attacks + counterattacks), generating Focus rapidly for Shielding Barrier uptime. Super Core’s team focus acceleration keeps backrow carries cycling skills faster.
#2


+8% DMG Mitigation and +8% DEF. Stacks with Resistance Armor’s +3% per heal for extreme damage reduction in extended fights. Diminishing returns are offset by the multiplicative interaction with high HP.
#3

+8% Heal effect. Amplifies Emergency Repair’s 30% ATK-as-HP restoration and any external healing. Keeps Shielding Barrier active longer by maintaining HP above critical thresholds.
#4


Death immunity with 30% HP restore provides a safety net if Yolanda is burst down before barrier stabilizes. +0.4% ATK per 1% HP lost is minor on a tank but the death immunity alone justifies the set.
#5

+8% DEF and +8% HP. Pure defensive stats that increase the base HP pool for Emergency Repair scaling and BabyBear’s Bleeding damage calculation.
#6

Yolanda is a tank who scales with HP and defensive stats. Unlike DPS heroes, she does not benefit from DMG Bonus, INT, STR, or Crit Rate on any slot. Maximize HP%, VIT, DEF, and DMG Mitigation across all four gear slots for maximum barrier uptime and self-sustain.
HP%, VIT, DMG Mitigation
HP% maximizes the barrier’s effective protection and BabyBear’s Bleeding damage (scales with remaining HP). VIT increases base HP. DMG Mitigation reduces all incoming damage.
HP%, VIT, AGI
HP% and VIT for maximum HP pool. AGI is Yolanda’s highest base stat (894) and further reduces incoming damage while protecting against AGI-targeting skills.
DEF, VIT, DMG Mitigation
Pure defense. DEF is the primary damage reduction stat; VIT adds HP; DMG Mitigation stacks with Resistance Armor for extreme damage reduction.
HP%, VIT, Skill Effect Enhancement
HP% and VIT maximize survivability. Skill Effect Enhancement directly boosts Shielding Barrier’s HP restoration (5% lost HP per action) and Emergency Repair’s healing.
Recommended lineups
Archetype tags describe playstyle. Each card shows recommended gear (helmet icons), APC parts, and War Beast. Open APC · View details for part skills and calculator link.


Yolanda lineups prioritize survivability. Metallic Dragon’s HP, DEF, DMG Mitigation, and Crit Immunity keep the dual-tank front healthy. Crimson Predator is viable if the lineup is well-geared.
Primary tank. Shielding Barrier enables counterattacks with Burning (150% TAC DMG via UW). BabyBear inflicts Bleeding on enemy front row. Super Core accelerates team focus. Round-1 barrier + taunt from UW.
AC Shield UW for battle-start durability. Alpha Bless grants team-wide shields and crit immunity. Guardian of Justice gives +5% DMG mitigation to all allies. Minutemen faction member.
Hellfire burns all enemies, stacking up to 15 layers with UW. Burns trigger Blaze Shark bullets. +8% DMG for all Minutemen.
Primary carry. Blaze Shark fires extra bullets off Benson’s burns and Yolanda’s Burning counterattacks. Marks 3 random enemies with Bullet Rain.
Heals front line to keep Yolanda’s barrier active. Mirage UW bleeding triggers Blaze Shark. Battlefield Assistance buffs highest-ATK ally (usually Heytex).
Yolanda anchors the front line with barrier-based tanking while Heytex carries from the backrow. Bolton provides AC Shield and Alpha Bless for round-1 durability. Benson burns all enemies, triggering both Blaze Shark bullets and BabyBear’s synergy with the DOT chain. Mira heals the front and provides Mirage UW bleeding. Yolanda’s counterattacks apply Burning via Nuke Pulse Launcher, passively contributing DOTs while tanking.


DOT lineup with dual tanks benefits from Metallic Dragon’s defensive stats. The damage comes from status detonation rather than raw ATK, so survivability is more important than offensive beast stats.
Primary tank and DOT source. BabyBear Bleeding on enemy front row and UW Burning on counterattacks feed Ivanov’s detonation. Self-Healing amplifies Emergency Repair for extended barrier uptime.
AC Shield for battle-start durability. Super Core accelerates focus. Alpha Bless for team-wide shields. Minutemen faction bonus.
Flaming Feast burns all enemies. Death Descend’s +100% sustained DMG doubles Ivanov’s detonation damage. Kitten’s Daydream Ash procs off Yolanda’s burns and BabyBear bleeds.
Core detonator. Detonates Yolanda’s Bleeding (BabyBear) and Burning (UW), Kobayakawa’s burns, and Margaret’s recycled statuses. Blizzard targets backrow first. Brave Soul buffs all Minutemen.
News Coverage recycles all expiring statuses including Yolanda’s DOTs. Focused stacks amplify detonation damage. Joint Signature boosts all Minutemen DOT damage.
Yolanda serves as both primary tank and passive DOT applicator in a full Minutemen detonation composition. BabyBear Bleeding and UW Burning feed Ivanov’s Hammer of Judgement detonation from the tank position. Bolton provides secondary tanking. Kobayakawa applies burns and Ash via Kitten’s Daydream. Margaret recycles all statuses and stacks Focused debuffs. Yolanda’s DOTs generate detonation fuel without consuming backrow action slots.


Double-tank lineup prioritizes survivability above all else. Metallic Dragon’s HP, DEF, DMG Mitigation, and Crit Immunity keep both tanks and the damage distribution pool healthy.
Link of Life distributes 50% of incoming damage across all heroes with +24% DMG mitigation. Guardian STR UW casts Link at battle start. Frosty Coffin grants +15% crit rate and +30% crit DMG.
Shielding Barrier enables counterattacks. Emergency Repair heals through Buri’s distributed damage. BabyBear Bleeding feeds the DOT chain. UW Burning on counterattacks adds more DOTs.
Burns all enemies. Hellfire UW for burn stacking. +8% DMG for Minutemen. Burns trigger Yolanda’s counter-synergies in the DOT chain.
Primary carry. Blaze Shark fires off Benson’s burns and Yolanda’s DOTs. Frosty Coffin crit bonuses from Buri make rocket hits crit frequently.
Heals front line, critical with Buri distributing damage. Mirage UW bleeding feeds DOT chain. Battlefield Assistance buffs Heytex.
Ultra-durable dual-tank front pairing Buri’s damage distribution with Yolanda’s barrier-based self-sustain. Buri’s Link of Life distributes damage across all heroes, and Yolanda’s Emergency Repair heals through the distributed damage. Benson and Heytex carry from the backrow while Mira provides healing. Extremely hard to kill but lower damage ceiling than dedicated DOT compositions — wins through pure attrition.
Synergies
Yolanda’s BabyBear Bleeding (4% remaining HP/round) and UW Burning (150% TAC DMG on every counterattack) provide two DOT types from the tank position. Ivanov detonates both with Hammer of Judgement. Winter Drink makes Yolanda’s DOTs deal +30% more damage. This synergy is uniquely efficient — DOTs are applied without spending backrow action economy.
Bolton’s AC Shield UW (200% max HP shield at battle start) absorbs early-round burst while Yolanda’s Shielding Barrier establishes. Guardian of Justice provides +5% DMG mitigation to all allies, stacking with Yolanda’s Resistance Armor. Both are Minutemen, contributing to faction bonus.
Buri’s Link of Life distributes 50% of incoming damage across all heroes. Yolanda’s Emergency Repair heals 30% of enemy ATK as HP per hit, effectively healing distributed damage across the entire team. Body of Fusion’s +10% HP and +10% DMG mitigation make her an ideal Link partner.
Benson’s Hellfire burns all enemies, which synergizes with Yolanda’s own Burning application via UW counterattacks. Multiple burn sources mean more DOT ticks per round, more Resistance Armor healing procs, and more detonation fuel for Ivanov when present.
Mira’s Battlefield Treatment heals the front line, directly supporting Yolanda’s barrier uptime. Healing triggers Resistance Armor’s +3% DMG mitigation stacking. Mirage UW bleeding adds another DOT type to the status chain alongside Yolanda’s Burning and BabyBear Bleeding.
Interactions with other heroes’ ultimate weapons.
Thunder Hammer gains +3% ATK (stacks 12) per Burning detonated and heals lowest-HP teammate by 20% max HP per Bleeding detonated. Yolanda provides both Burning (UW counterattacks) and Bleeding (BabyBear), giving Ivanov ATK scaling and team healing from detonating her statuses alone — without any backrow hero needing to apply DOTs.
Blaze Shark fires extra bullets when Minutemen allies inflict status effects. Yolanda’s UW applies Burning on every attack and counterattack. As a front-row tank receiving frequent attacks, her counterattack Burning procs trigger multiple Blaze Shark bullets per round, turning defensive actions into offensive output.
While Link of Life is active, all allies gain +15% crit rate and +30% crit damage. Yolanda’s Pulse Blaster counterattacks (100% TAC DMG, 25% stun) benefit from crit bonuses, adding burst potential to her defensive kit. Buri’s damage distribution keeps Yolanda’s barrier active longer by reducing spike damage.
Ultimate weapons

- Ultimate Weapon’s Energy 6,700
- TAC DEF 25%
- WPN DEF 25%
- HP 80%
Unlocked
At the start of the battle, gain 1 round of [Shielding Barrier]. When casting the Focus Skill, Taunt all enemies and increase the hero’s DEF by 15%, lasting 1 round(s).
★
At the start of the battle, gain 1 round of [Shielding Barrier]. When casting the Focus Skill, Taunt all enemies and increase the hero’s DEF by 18%, lasting 1 round(s).
★★
At the start of the battle, gain 1 round of [Shielding Barrier]. When casting the Focus Skill, Taunt all enemies and increase the hero’s DEF by 21%, lasting 1 round(s). In normal attacks and counterattacks, apply the "Burning" status to the target, dealing 80% TAC DMG each round, lasting 2 rounds.
★★★
At the start of the battle, gain 1 round of [Shielding Barrier]. When casting the Focus Skill, Taunt all enemies and increase the hero’s DEF by 24%, lasting 1 round(s). In normal attacks and counterattacks, apply the "Burning" status to the target, dealing 100% TAC DMG each round, lasting 2 rounds.
★★★★
At the start of the battle, gain 1 round of [Shielding Barrier]. When casting the Focus Skill, Taunt all enemies and increase the hero’s DEF by 30%, lasting 1 round(s). In normal attacks and counterattacks, apply the "Burning" status to the target, dealing 120% TAC DMG each round, lasting 2 rounds.
★★★★★
At the start of the battle, gain 1 round of [Shielding Barrier]. When casting the Focus Skill, Taunt all enemies and increase the hero’s DEF by 30%, lasting 2 round(s). In normal attacks and counterattacks, apply the "Burning" status to the target, dealing 150% TAC DMG each round, lasting 2 rounds.
Counters
- Casino (Hard Counter) — Casino’s Double Down drains 200 Focus from all enemies, preventing Yolanda from casting Shielding Barrier. Without barrier, she loses counterattacks, Pulse Blaster stun, BabyBear Bleeding, and Resistance Armor stacking — her entire kit is barrier-dependent.
- Kelly (Soft Counter) — Kelly’s Hunting targets the lowest-AGI enemy, bypassing Yolanda’s front-row position to snipe backrow carries. Yolanda cannot protect teammates from position-ignoring targeting. Spine Whip UW’s double-action potential can kill a backrow carry before Yolanda’s taunt activates.
- Sustained DPS carries (Soft Counter) — Heroes that deal consistent high damage every round (Heytex rockets, Victoria Lightsword) can burn through BabyBear’s 4pc emergency DMG mitigation triggers. The +90% DMG mitigation drops by 20% per subsequent trigger, eventually becoming ineffective against sustained pressure.
- Single-target burst lineups (Hard Counter) — Yolanda’s barrier + Emergency Repair + Resistance Armor stacking makes her extremely resilient against single large hits. Burst lineups that rely on one big skill to kill a tank (Galande, Blanche) find their damage reduced by stacking DMG mitigation and healed back by Emergency Repair. BabyBear’s 4pc +90% DMG mitigation on spike damage is specifically designed to counter burst.
- Auto-attack-heavy lineups (Soft Counter) — Lineups relying on normal attacks trigger frequent Pulse Blaster counterattacks (100% TAC DMG, 25% stun). Each hit received also triggers Emergency Repair healing. More incoming attacks means more counterattack damage, more healing, and faster Resistance Armor stacking.
Rating
S Tier. Yolanda is an S-tier counter-tank who scales defensively through fights while passively contributing DOTs to Minutemen status chains. BabyBear’s Bleeding and Nuke Pulse Launcher’s Burning make her uniquely valuable as a tank that feeds Ivanov’s detonation and triggers Blaze Shark bullets without requiring backrow action slots. Her barrier-based kit with counterattacks, stacking DMG mitigation, and self-healing makes her the most self-sufficient tank in the game, and her dual-purpose role as both frontliner and passive DOT source is unmatched, earning her S-tier status.
Videos
Official: (none in data)
Skins
None
Trivia
None